我们一般拿到一个小鸡后,都会想着去DD一个系统。而常用的萌咖DD脚本装出来的系统,会硬生生分割1G扩展分区作为独立swap空间。可是本来小鸡的硬盘就不大,这个时候怎么办呢?这里就需要把swap分区容量回归到主分区上。即便在后面使用中小鸡自带内存不够用时,根据需要,我们也可以添加自定义大小的swap在主分区上,添加/删除也很简单。
下面我们就开始一步步操作吧!
1、首先查看Swap位置:swapon -s
root@:~# swapon -s
Filename                                Type            Size    Used    Priority
/dev/sda5 partition 2094076 0 -12、关闭Swap:/sbin/swapoff /dev/sda5
root@:~# /sbin/swapoff /dev/sda53、将其删除开机启动:nano /etc/fstab
找到并删除类似于:
UUID=e882xe3f-48xx-4bxx-9cea-01f1af74exxx none swap sw 0 $ 04、保存,reboot 重启,然后删除Swap占用硬盘容量的分区
root@:~# fdisk -l     #查看分区
Disk /dev/sda: 20 GiB, 21474836480 bytes, 41943040 sectors
Units: sectors of 1 * 512 = 512 bytes
Sector size (logical/physical): 512 bytes / 512 bytes
I/O size (minimum/optimal): 512 bytes / 512 bytes
Disklabel type: dos
Disk identifier: 0xb4b4e733

Device     Boot    Start      End  Sectors Size Id Type
/dev/sda1  *        2048 37750783 37748736  18G 83 Linux
/dev/sda2       37752830 41940991  4188162   2G  5 Extended
/dev/sda5       37752832 41940991  4188160   2G 82 Linux swap / Solaris

root@:~# fdisk /dev/sda     #此处"/dev/sda" 根据你的显示进行修改
Welcome to fdisk (util-linux 2.29.2).
Changes will remain in memory only, until you decide to write them.
Be careful before using the write command.

Command (m for help):d     #删除
Partition number (1,2,5, default 5):5     #序号为"5"的分区
Partition 5 has been deleted.

Command (m for help):d     #删除
Partition number (1,2, default 2): 2     #序号为"2"的分区
Partition 2 has been deleted.

Command (m for help):w     #保存
The partition table has been altered.
Calling ioctl() to re-read partition table.
Re-reading the partition table failed.: Device or resource busy

The kernel still uses the old table. The new table will be used at the next reboot or after you run partprobe(8) or kpartx(8).
5、将删除的空间扩容至主空间
安装growpart软件

# centos:
yum install -y cloud-utils-growpart
# Debian:
apt install -y cloud-guest-utils

* 如果你硬盘是GPT格式的请安装以下软件,MBR格式请忽略。——怎么查看硬盘格式是GPT,还是MBR?这个见本文最下方。

# centos:
yum install gdisk -y
# Debian:
apt-get install gdisk -yroot@:~# growpart /dev/sda 1
failed [pt_update:1] pt_update /dev/sda 1
partx: /dev/sda: error updating partition 1
FAILED: pt_resize failed
root@:~# resize2fs /dev/sda1
resize2fs 1.43.4 (31-Jan-2017)
The filesystem is already 4718592 (4k) blocks long. Nothing to do!
root@:~# df -h
Filesystem Size Used Avail Use% Mounted on
udev 992M 0 992M 0% /dev
tmpfs 201M 2.9M 198M 2% /run
/dev/sda1 18G 742M 16G 5% /
tmpfs 1003M 0 1003M 0% /dev/shm
tmpfs 5.0M 0 5.0M 0% /run/lock
tmpfs 1003M 0 1003M 0% /sys/fs/cgroup
tmpfs 201M 0 201M 0% /run/user/0如果 df -h 显示未成功扩容,则 reboot 重启后再次执行 resize2fs /dev/sda1
root@:~# resize2fs /dev/sda1resize2fs 1.43.4 (31-Jan-2017)
Filesystem at /dev/sda1 is mounted on /; on-line resizing required
old_desc_blocks = 3, new_desc_blocks = 3
The filesystem on /dev/vda1 is now 5242619 (4k) blocks long.root@:~# df -hFilesystem      Size  Used Avail Use% Mounted on
udev            992M     0  992M   0% /dev
tmpfs           201M  2.9M  198M   2% /run
/dev/sda1        20G  742M   18G   4% /
tmpfs          1003M     0 1003M   0% /dev/shm
tmpfs           5.0M     0  5.0M   0% /run/lock
tmpfs          1003M     0 1003M   0% /sys/fs/cgroup
tmpfs           201M     0  201M   0% /run/user/0
完成!白花花的2G容量回归了主分区上。
6、如果再次需要swap的话,可以运行一键添加swap脚本,这个脚本可以很轻松的添加/删除swap,而且添加的swap位于主分区上可以随时拆装。
一键添加/删除Swap虚拟内存(不支持open vz) :

wget https://www.moerats.com/usr/shell/swap.sh && bash swap.sh
常见问题:
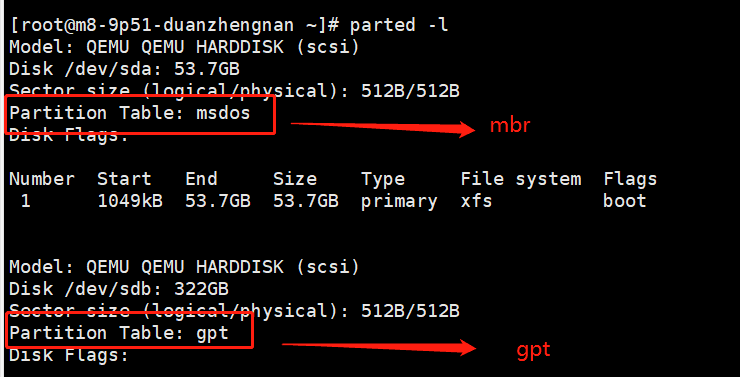
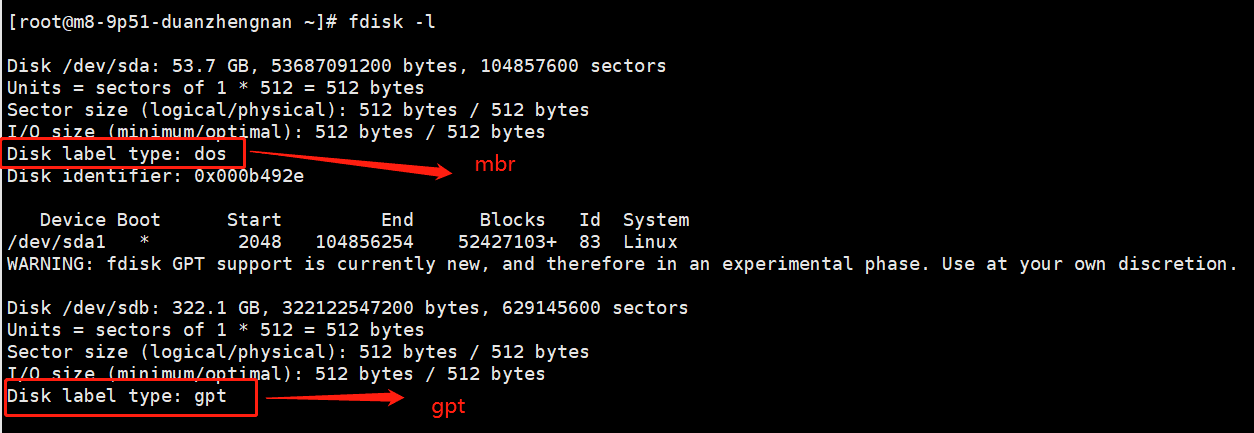
* 怎么查看硬盘格式是GPT,还是MBR?
方法一:
fdisk -l
方法二:
parted -l